

.jpg) I would hate to have to guess any many hours work have been put into the model at this stage, and I doubt I'm halfway through the build yet.
I would hate to have to guess any many hours work have been put into the model at this stage, and I doubt I'm halfway through the build yet..jpg) A lot of time was spent very early on in the build making sure that all the decoration etc was going to fit, I can not stress this enough it is far better to spend another week if needed to get things right at the beginning, than have to start taking things apart or altering things at this stage. Before gluing something in place have a look what fits to it or how it effects other things around it.
A lot of time was spent very early on in the build making sure that all the decoration etc was going to fit, I can not stress this enough it is far better to spend another week if needed to get things right at the beginning, than have to start taking things apart or altering things at this stage. Before gluing something in place have a look what fits to it or how it effects other things around it. Take for example before gluing the brass moulding above the windows on the stern I checked to see that the coat of arms and crown would fit into place.
.jpg)
.jpg)
.jpg)
.jpg) Various close ups of the stern galleries, as with all things on ship modelling there really is no quick way of achieving a clean look, other than patience and even more patience.
Various close ups of the stern galleries, as with all things on ship modelling there really is no quick way of achieving a clean look, other than patience and even more patience. .jpg)
.jpg) The decoration along the top of the coat of arms is actually cut into 2, the slight gap is under the coat of arms so as not to be visible.
The decoration along the top of the coat of arms is actually cut into 2, the slight gap is under the coat of arms so as not to be visible. .jpg)
.jpg) I decided after looking at other peoples examples of the San Felipe to paint the coat of arms in red and white, it also adds a little colour to the model.
I decided after looking at other peoples examples of the San Felipe to paint the coat of arms in red and white, it also adds a little colour to the model..jpg) The openings under the gallery where the rear canons will be are to be blacked out at a later stage.
The openings under the gallery where the rear canons will be are to be blacked out at a later stage.
Now I painted the bottom gallery blue and started to fit the cast decorations, I started in the middle and worked either side. Four or five of the corner ones had to been curved in both directions, this was done over a shaped block of wood and gently hammered into the correct shape.
.jpg)
.jpg)
.jpg)


.jpg) The line between the varnished hull and the blue at the forecastle will eventually have a brass moulding to bridge the line, this will be the same along the hull to the stern.
The line between the varnished hull and the blue at the forecastle will eventually have a brass moulding to bridge the line, this will be the same along the hull to the stern.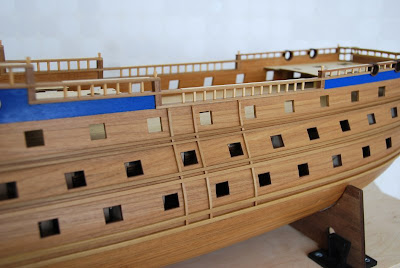.jpg)
.jpg)
.jpg)
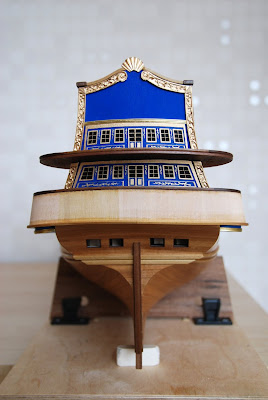.jpg) A view of the stern, the details around the doors and windows have been painted blue and then a gold applied, the stern was painted black in the correct place before
A view of the stern, the details around the doors and windows have been painted blue and then a gold applied, the stern was painted black in the correct place before .jpg)
.jpg)
.jpg)
.jpg)

.jpg)
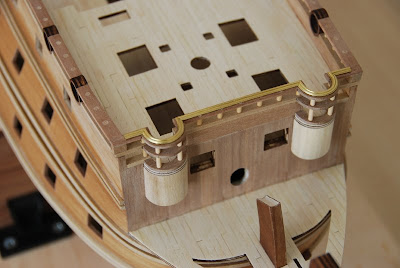.jpg) Another view of the forecastle, the large square holes are where the gratings will be positioned. The ends of the dowel will be eventually a thin piece of lime.
Another view of the forecastle, the large square holes are where the gratings will be positioned. The ends of the dowel will be eventually a thin piece of lime..jpg) A brass decorative moulding was applied to the forecastle handrail, very difficult to do neatly as the brass moulding had to be bent in its width, and was very stiff indeed and took several failed attempts to get right.
A brass decorative moulding was applied to the forecastle handrail, very difficult to do neatly as the brass moulding had to be bent in its width, and was very stiff indeed and took several failed attempts to get right. It was very difficult trying to bend the brass moulding in the width, a very helpful chap on the ship modeling forum told me about this method. It
 .jpg) The front circular gun ports took a good few evenings to get exactly correct, 2 mm dowelling was used to form all the balustrade's, this was quite tricky as the balustrade's had to be square to the water line (or plumb) and not square to the handrail, much in the same way it is when you walk up a stair case.
The front circular gun ports took a good few evenings to get exactly correct, 2 mm dowelling was used to form all the balustrade's, this was quite tricky as the balustrade's had to be square to the water line (or plumb) and not square to the handrail, much in the same way it is when you walk up a stair case.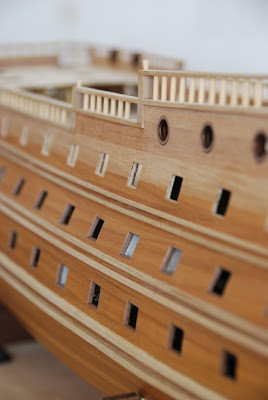.jpg) Close up of the gun ports, the bottom 2 layers had to be lined out with 0.5 x 3 mm to mask the different layers of timber through the hull (lime / walnut ) the top layer did not need this as there are to be brass inserts placed into the openings. The circular gun ports have now been cut out this was done in much the same way and adjusted with a small rotary sanding drum used in my miniature drill. Inside the gun ports will be eventually blacked out. If you look closely (click on the photo to enlarge) you can clearly see the 3 layers of the hull construction in the top row of square gun ports (walnut / lime / walnut)
Close up of the gun ports, the bottom 2 layers had to be lined out with 0.5 x 3 mm to mask the different layers of timber through the hull (lime / walnut ) the top layer did not need this as there are to be brass inserts placed into the openings. The circular gun ports have now been cut out this was done in much the same way and adjusted with a small rotary sanding drum used in my miniature drill. Inside the gun ports will be eventually blacked out. If you look closely (click on the photo to enlarge) you can clearly see the 3 layers of the hull construction in the top row of square gun ports (walnut / lime / walnut).jpg)
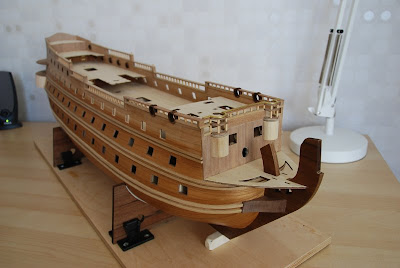.jpg) An overall view of the hull with the side moulding in position, its finally starting to look something now, and each piece quite rewarding, in the early stages of construction you could spend a week on planking the hull and it did not look much different. Still years of work left but certainly broke the back of the monotonous work.
An overall view of the hull with the side moulding in position, its finally starting to look something now, and each piece quite rewarding, in the early stages of construction you could spend a week on planking the hull and it did not look much different. Still years of work left but certainly broke the back of the monotonous work..jpg)
.jpg)
.jpg)


.jpg)
.jpg)
.jpg)
.jpg)
.jpg)
.jpg)
.jpg)
.jpg)